I'm a strong believer of trying to give the best of our children as early as possible and I remember that delivering via Cesarean was a disadvantage of instantly having my milk come out as easily compared to giving birth naturally. Given this, I was more determined than ever to ensure that my little C gets at least colostrum and some breastmilk. I went through almost everything that could be imagined (and avoided a few close calls of "clogged ducts" due to instincts) and this includes having to pump and store my milk while I'm traveling. A lot coordination and scheduling was done and there have been no regrets for all the hassles and inconveniences that I and my family have gone through to ensure C gets his stock of breastmilk.
Now that C's about 1 year and 6 months old, I'm considering of weaning him and hope that I'll be successful since he and I have been latching as long as he knows me...I'm sure it's going to be a tough task at hand.
I am posting the below to maybe assist friends of mine here who might have concerns regarding pumping/expressing breastmilk when traveling.
****PLEASE READ ARTICLE BELOW ON TRAVELING WITH BREASTMILK. THIS IS FROM FRIDGETOGO.MULTIPLY.COM's Stephanie****
Expressing breastmilk while traveling is not easy; but neither is it impossible! With a little chutzpah and a whole lot of planning and logistics, you can keep pumping even while you travel!
During my baby's first year, I had to travel thrice without my baby. By coming up with a game plan and a system, I was able to bring home all of my pumped milk each time I traveled.
Here are some tips that worked for me:
A. Things to bring:
1. Your pump
a. Electric Pump
Electric pumps that enable you to pump both breasts at the same time are time-saving. When you are in a hurry during travel, the 15 minutes you save by pumping both breasts at the same time as opposed to taking 30 minutes to pump both breasts one after the other is precious! Added up, it could mean 2 hours more for sightseeing, shopping, working, or sleeping each day!
b. Manual Pump
A manual pump is very handy during travel because it is so much lighter and portable than an electric pump. It is very useful during transit -- in the plane, a train, a bus, a car, etc -- any mode of transport wherein you will have at least 35 minutes to pump. Bring your manual pump along will enable you to make better use of travel time. Instead of still having to pump once you get to your destination, you've already gotten one pumping session down and it will be in another 4 hours or so before you'll need to pump again. It's also much easier to use when there is limited space, which is the case when you are on board a plane, in a bus, etc.
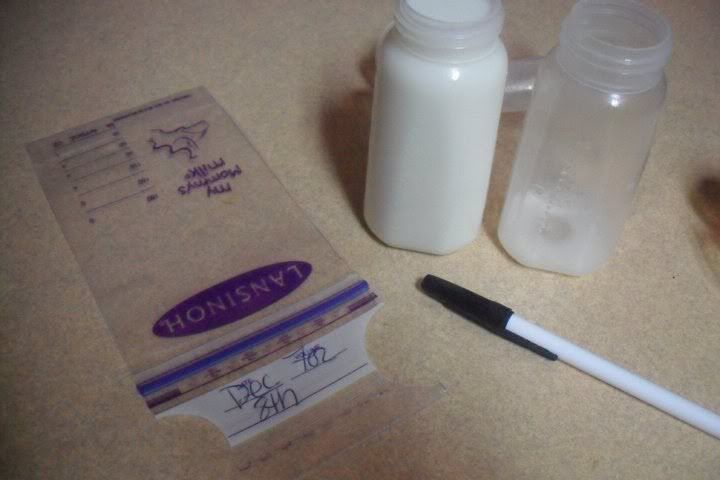
2. Storage Bottle/s or Storage Bags
I bring only 1 or two storage bottles. After pumping or when I get back to the hotel, I transfer the milk into the Storage Bags. Sometimes, I also pump directly into the Storage Bags. This way, I keep the Storage Bottles clean longer and hence, will not have to wash it right away.
3. Nursing Cover
A MUST for pumping in public. If you want to continue pumping even while traveling, you must forget about being shy. It's the only way you will be able to maximize your time. Take comfort in the fact that traveling gives you a certain level of anonymity and you can get away with more things when you are abroad than if you were back home. (Then again, being in Manila never stopped me from pumping in public -- it's really a matter of finding discreet spots.)
4. Detergent
I normally use a dish detergent for babies when at home. However, the first time I used it abroad, I was not able to find a very secure container so it spilled. Thank goodness I kept it in a separate ziplock bag. The next time I traveled, I used those paste detergents. I chose the one with the mildest scent and I think it worked fine. I am what some people call a "quack", wanting to use all things natural, etc. but every now and then, I compromise in the name of efficiency and practicality. If you find a good container for your liquid detergents, though, which I'm sure are available, then great. If not, get a detergent in paste form. Guaranteed, no spillage, no mess.
5. Sponge for bottles and Sponge for Sink
Bring a sponge to clean the hotel sink each time you use it to clean your bottles. Use warm water to rinse the sink just to be safe. Remember, just because it is "your" hotel room doesn't mean it's actually yours. It is still, technically, a "public" toilet and you will never know how well the cleaning lady really does her job.
Do not use the same sponge you use for your bottles for the bathroom sink. Get sponges in different colors so you can distinguish them and store them separately as well when not in use.
5. Small plastic container with holes or gaps that allow water to pass thru
Even after washing the sink, do not put your pump parts directly on the sink. Bring a small tray or plastic container for this purpose. This can also serve as a drying rack. Please refer to the picture for a sample.
6. Big Freezer Bags
Put your storage bags (once filled with milk) in here. It will be a safeguard in case any of the bags bursts or leaks. You can also keep you milk in this bag when requesting the hotel to store your milk from you. These bags will keep your milk from absorbing any freezer or refrigerator smells.
7. Dish rag
Bring a dish rag that is to be used only to wipe your bottles / pump parts when you do not have time to wait for them to air-dry.
8. Container for your pump parts
Always helpful, even in Manila. You can store your pump parts in your cooler or the hotel's refrigerator for use throughout the day. It's really not necessary to sterilize after each use. I promise.
9. Your Fridge to Go!
Essential while on the plane and especially when you are bringing home your pumped milk. During travel, depending on the model you have, it may be a bit heavy to lug around all day. After all, any thing you have to carry all day while traveling becomes a hassle after a couple of hours. Some options are:
-- If convenient, bring milk that was pumped outside back to hotel before you reach the 3 hour limit. Remember, freshly-expressed milk is good for 3 hours in room temperature. If you will make it back to your hotel room in 3 hours, you do not need to bring a cooler with you.
-- Put Fridge to Go in hand-carry luggage with wheels. This way, you don't carry it -- you just pull the bag that contains it.
-- For travel, the best model to bring is the Victoria of course it always depends on the number of days you will be away. For overnight trips, the Pack N' Go and Mini-Fridge are sufficient.
You need to use the best when cooler bag when transporting, and especially when traveling with, breastmilk. Fridge to Go outperforms any other cooler bag in the market. Check out my blogs page for the data.
10. Wet Wipes and Hand Sanitizers
Get the ones you can place in your bag for when you really do not have access to soap and water to wash your hands before pumping.
12. Tissue
Very helpful for accidental spills.
13. Bottle Brush / Tongs (Optional)
I did not bring these anymore to save space and to minimize the number of things I need to pack although if you prefer, these do come in handy when cleaning bottles.
14. Sterilizing Tablets (Optional)
You can find sterilizing tablets in the US or Singapore. I used them during my first trip but not on my succeeding trips because I figured, if the Medela manual says just wash in hot, soapy water then surely it is safe to skip sterilizing, right? Especially if it's only for a few days. What I do as an extra cleaning step is to pour freshly-boiled water on my pump parts using the electric kettle provided in most hotel rooms.
15. Medela Quick Clean Wipes (Optional)
This is handy. You can use this to clean pump parts when they're dirty and you have no way of properly washing it until you get back to the hotel. Just wipe it thoroughly with the Quick Clean Wipes after use and it's good to go the next time you pump. OR, rinse in hot water. Of course I always try to find a way to rinse it in hot water before using. Makes me uncomfortable not to rinse coz the wipes have soap. Thought of using pump cleaned with soap without rinsing first is scary. I never dared to follow Medela's instructions on this one.
B. To freeze or not to freeze your pumped milk
-- For trips below 6 days, there is no need to freeze your milk because freshly pumped milk is actually good for 7 days in the refrigerator. I say trips below 6 days just to be on the safe side. One Fridge to Go fan, however, went on a 7-day trip to Japan and brought home all her pumped milk chilled only, not frozen, without encountering any problems with her baby.
-- When you get home, that is the time you FREEZE your chilled milk.
-- For trips that go beyond 7 days, you must freeze. One Fridge to Go user was able to successfully bring home all her frozen milk by using dry ice -- just make sure to wrap the dry ice in newspaper to prevent it from "burning" your milk. She said she came home with all her milk still frozen. I have not personally tried this but have always kept it in mind should I need to bring home frozen milk in the future.
C. How to bring your pumped milk home:
1. Keep all storage bags in the Big Freezer Bag. Make sure the freezer bag is not too full so as not to cause any of your storage bags to burst.
2. Ask the concierge to freeze your Fridge to Go in the hotel freezer at least 2 nights before your departure. This is to ensure that it is frozen very, very well.
3. Packing your breastmilk into your Fridge to Go should be the LAST thing you do before you leave the hotel. This is to minimize the amount of time your milk is exposed to room temperature and to lengthen the performance of your Fridge to Go.
4. As an extra precaution, use blue ice to extend the performance of your Fridge to Go when traveling. You do not want to risk your milk getting spoiled in case of delays, traffic, or other unforseen events. In addition, the time you leave your hotel to the time your plane lands in your destination to the time you actually reach your home will take longer than 12 hours (even for short trips) and the cooling power of Fridge to Go, while already much longer than other cooler bags, is only up to 12 hours.
5. For extra long flights, some have successfully used dry ice. This has even enabled some to bring home frozen milk.
6. You may pack your Fridge to Go with breastmilk into your luggage for check in. Your Fridge to Go cooler bag will not condense and cause contents of luggage to get wet. As a precaution, you may place your Fridge to Go in the big laundry bags hotels provide.
7. If you prefer to bring your Fridge to Go and pumped milk with you on board the plane, you MUST have with you a doctor's certificate to prove that you are a breastfeeding mom. Even if you show your pump parts and even if your cup runneth over and you are obviously lactating, airport officials will, as a matter of policy, make you THROW the milk away. So, if you intend to carry any of your pumped milk on board a plane, you MUST have a doctor's certificate.
8. The rule in the HK airport is that as long as your CONTAINER is not more than 100ML, you can bring it in without a doctor's certificate. Otherwise, you need to throw out the contents.
9. The advantage of hand-carrying your pumped milk is so that you can make sure it stays cold. If, after several hours you notice that your Fridge to Go is losing its coolness, you can ask for ice from the airplane staff. Just make sure you have a ziplock bag ready for you to place the ice in. This will tide you over until you get home.
Like I said, pumping while traveling is not impossible. The rewards, on the other hand, are that you do not lose your milk supply and your baby will have so much nourishing milk once you return. That, my friends, is the best pasalubong you can ever bring home for your baby. Pumping while traveling, as is practically everything a mother does for her child, is truly a labor of LOVE.
Electric pumps that enable you to pump both breasts at the same time are time-saving. When you are in a hurry during travel, the 15 minutes you save by pumping both breasts at the same time as opposed to taking 30 minutes to pump both breasts one after the other is precious! Added up, it could mean 2 hours more for sightseeing, shopping, working, or sleeping each day!
b. Manual Pump
A manual pump is very handy during travel because it is so much lighter and portable than an electric pump. It is very useful during transit -- in the plane, a train, a bus, a car, etc -- any mode of transport wherein you will have at least 35 minutes to pump. Bring your manual pump along will enable you to make better use of travel time. Instead of still having to pump once you get to your destination, you've already gotten one pumping session down and it will be in another 4 hours or so before you'll need to pump again. It's also much easier to use when there is limited space, which is the case when you are on board a plane, in a bus, etc.
2. Storage Bottle/s or Storage Bags
I bring only 1 or two storage bottles. After pumping or when I get back to the hotel, I transfer the milk into the Storage Bags. Sometimes, I also pump directly into the Storage Bags. This way, I keep the Storage Bottles clean longer and hence, will not have to wash it right away.
3. Nursing Cover
A MUST for pumping in public. If you want to continue pumping even while traveling, you must forget about being shy. It's the only way you will be able to maximize your time. Take comfort in the fact that traveling gives you a certain level of anonymity and you can get away with more things when you are abroad than if you were back home. (Then again, being in Manila never stopped me from pumping in public -- it's really a matter of finding discreet spots.)
4. Detergent
I normally use a dish detergent for babies when at home. However, the first time I used it abroad, I was not able to find a very secure container so it spilled. Thank goodness I kept it in a separate ziplock bag. The next time I traveled, I used those paste detergents. I chose the one with the mildest scent and I think it worked fine. I am what some people call a "quack", wanting to use all things natural, etc. but every now and then, I compromise in the name of efficiency and practicality. If you find a good container for your liquid detergents, though, which I'm sure are available, then great. If not, get a detergent in paste form. Guaranteed, no spillage, no mess.
5. Sponge for bottles and Sponge for Sink
Bring a sponge to clean the hotel sink each time you use it to clean your bottles. Use warm water to rinse the sink just to be safe. Remember, just because it is "your" hotel room doesn't mean it's actually yours. It is still, technically, a "public" toilet and you will never know how well the cleaning lady really does her job.
Do not use the same sponge you use for your bottles for the bathroom sink. Get sponges in different colors so you can distinguish them and store them separately as well when not in use.
5. Small plastic container with holes or gaps that allow water to pass thru
Even after washing the sink, do not put your pump parts directly on the sink. Bring a small tray or plastic container for this purpose. This can also serve as a drying rack. Please refer to the picture for a sample.
6. Big Freezer Bags
Put your storage bags (once filled with milk) in here. It will be a safeguard in case any of the bags bursts or leaks. You can also keep you milk in this bag when requesting the hotel to store your milk from you. These bags will keep your milk from absorbing any freezer or refrigerator smells.
7. Dish rag
Bring a dish rag that is to be used only to wipe your bottles / pump parts when you do not have time to wait for them to air-dry.
8. Container for your pump parts
Always helpful, even in Manila. You can store your pump parts in your cooler or the hotel's refrigerator for use throughout the day. It's really not necessary to sterilize after each use. I promise.
9. Your Fridge to Go!
Essential while on the plane and especially when you are bringing home your pumped milk. During travel, depending on the model you have, it may be a bit heavy to lug around all day. After all, any thing you have to carry all day while traveling becomes a hassle after a couple of hours. Some options are:
-- If convenient, bring milk that was pumped outside back to hotel before you reach the 3 hour limit. Remember, freshly-expressed milk is good for 3 hours in room temperature. If you will make it back to your hotel room in 3 hours, you do not need to bring a cooler with you.
-- Put Fridge to Go in hand-carry luggage with wheels. This way, you don't carry it -- you just pull the bag that contains it.
-- For travel, the best model to bring is the Victoria of course it always depends on the number of days you will be away. For overnight trips, the Pack N' Go and Mini-Fridge are sufficient.
You need to use the best when cooler bag when transporting, and especially when traveling with, breastmilk. Fridge to Go outperforms any other cooler bag in the market. Check out my blogs page for the data.
10. Wet Wipes and Hand Sanitizers
Get the ones you can place in your bag for when you really do not have access to soap and water to wash your hands before pumping.
12. Tissue
Very helpful for accidental spills.
13. Bottle Brush / Tongs (Optional)
I did not bring these anymore to save space and to minimize the number of things I need to pack although if you prefer, these do come in handy when cleaning bottles.
14. Sterilizing Tablets (Optional)
You can find sterilizing tablets in the US or Singapore. I used them during my first trip but not on my succeeding trips because I figured, if the Medela manual says just wash in hot, soapy water then surely it is safe to skip sterilizing, right? Especially if it's only for a few days. What I do as an extra cleaning step is to pour freshly-boiled water on my pump parts using the electric kettle provided in most hotel rooms.
15. Medela Quick Clean Wipes (Optional)
This is handy. You can use this to clean pump parts when they're dirty and you have no way of properly washing it until you get back to the hotel. Just wipe it thoroughly with the Quick Clean Wipes after use and it's good to go the next time you pump. OR, rinse in hot water. Of course I always try to find a way to rinse it in hot water before using. Makes me uncomfortable not to rinse coz the wipes have soap. Thought of using pump cleaned with soap without rinsing first is scary. I never dared to follow Medela's instructions on this one.
B. To freeze or not to freeze your pumped milk
-- For trips below 6 days, there is no need to freeze your milk because freshly pumped milk is actually good for 7 days in the refrigerator. I say trips below 6 days just to be on the safe side. One Fridge to Go fan, however, went on a 7-day trip to Japan and brought home all her pumped milk chilled only, not frozen, without encountering any problems with her baby.
-- When you get home, that is the time you FREEZE your chilled milk.
-- For trips that go beyond 7 days, you must freeze. One Fridge to Go user was able to successfully bring home all her frozen milk by using dry ice -- just make sure to wrap the dry ice in newspaper to prevent it from "burning" your milk. She said she came home with all her milk still frozen. I have not personally tried this but have always kept it in mind should I need to bring home frozen milk in the future.
C. How to bring your pumped milk home:
1. Keep all storage bags in the Big Freezer Bag. Make sure the freezer bag is not too full so as not to cause any of your storage bags to burst.
2. Ask the concierge to freeze your Fridge to Go in the hotel freezer at least 2 nights before your departure. This is to ensure that it is frozen very, very well.
3. Packing your breastmilk into your Fridge to Go should be the LAST thing you do before you leave the hotel. This is to minimize the amount of time your milk is exposed to room temperature and to lengthen the performance of your Fridge to Go.
4. As an extra precaution, use blue ice to extend the performance of your Fridge to Go when traveling. You do not want to risk your milk getting spoiled in case of delays, traffic, or other unforseen events. In addition, the time you leave your hotel to the time your plane lands in your destination to the time you actually reach your home will take longer than 12 hours (even for short trips) and the cooling power of Fridge to Go, while already much longer than other cooler bags, is only up to 12 hours.
5. For extra long flights, some have successfully used dry ice. This has even enabled some to bring home frozen milk.
6. You may pack your Fridge to Go with breastmilk into your luggage for check in. Your Fridge to Go cooler bag will not condense and cause contents of luggage to get wet. As a precaution, you may place your Fridge to Go in the big laundry bags hotels provide.
7. If you prefer to bring your Fridge to Go and pumped milk with you on board the plane, you MUST have with you a doctor's certificate to prove that you are a breastfeeding mom. Even if you show your pump parts and even if your cup runneth over and you are obviously lactating, airport officials will, as a matter of policy, make you THROW the milk away. So, if you intend to carry any of your pumped milk on board a plane, you MUST have a doctor's certificate.
8. The rule in the HK airport is that as long as your CONTAINER is not more than 100ML, you can bring it in without a doctor's certificate. Otherwise, you need to throw out the contents.
9. The advantage of hand-carrying your pumped milk is so that you can make sure it stays cold. If, after several hours you notice that your Fridge to Go is losing its coolness, you can ask for ice from the airplane staff. Just make sure you have a ziplock bag ready for you to place the ice in. This will tide you over until you get home.
Like I said, pumping while traveling is not impossible. The rewards, on the other hand, are that you do not lose your milk supply and your baby will have so much nourishing milk once you return. That, my friends, is the best pasalubong you can ever bring home for your baby. Pumping while traveling, as is practically everything a mother does for her child, is truly a labor of LOVE.