accessories (1) activity in a box (2) alendronate (1) alternative births (8) Announcements (9) AP (1) Arugaan (7) Attachment Parenting (3) baby (74) baby-breastmilk (24) Baby-Led Weaning (3) baby-water (5) babywearing (10) Bali (3) BFP (17) births (8) breastfeeding (34) Butterfly Crafts (4) charity (2) cloth diaper (1) CNN Hero (4) contests (1) CW (6) digitalGinger (2) Digizines (25) Divine Digital (12) Doodleboogs (36) DPH (4) DSJunkie (1) ecowaste (1) events (11) featured (13) Food Trips (34) fosamax (1) Gentle Birth in the Philippines (6) Giveaways (1) golf (2) guest writer (2) hailan (2) hair (1) Hakab N 2014 (2) Hakab Na 2015 (1) HKG birth (8) home births (5) Home Decor (4) Homebirthing in the Philippines (3) Hong Kong (2) hybrid project (2) ibm2014 (3) Ibu Robin Lim (4) instructions (1) JJ Jr (6) kid recommended (5) kid-friendly (6) kids (10) kids activities (5) Krazy Mary (4) L.A.T.C.H. (5) lactation (7) LeahF (14) McGill (1) MCNP (1) Mei Tai (1) Mikki Livanos (19) Milestone (26) Milk Mommy Diaries (5) MKC (53) Montreal (1) NatW (7) newborn (8) news coverage (5) Oli's Boxship (1) osteoperosis (1) PageMaps (1) paper projects (1) parent-friendly (7) parties (2) Positive Discipline (2) PP Scrappin (8) pregnancy (9) Product Reviews (4) Puppy (3) recipes (2) remedies (2) Ruxpin (1) scrapbooking (1) Shabby Scrap Designs (18) Stand Up And Scrap (2) SW (3) Sweet Sodypop Designs (7) Travel Guide (6) travel tips (5) Twopeas (4) UN MDG 2014 (4) UNTV (3) Veronica Spriggs (3) videos (2) WatW (20) wedding (10) yolanda (1)

Friday, February 21, 2014

Product Review (Pt 2) : Activity in a Box - KaHone

I was fortunate enough to product test another Activity in a Box aside from ExploreSandbox that might of interest to you. It's call KaHone Art - Discover the World in a Box.


The box that I got for this month. The theme is Space. I got excited about this since it is something new for C and I'm sure he would be interested to know what is up in the sky and beyond. The activities are:
  1. Alien Headband
  2. Build a Rocketship
  3. Make Day and Night Happen
  4. Bonus Activity - Power of the Sun
On first impression, before even getting the box - there was already a problem with its transport/delivery to me. My friend, Jenny, had to be very careful with its transport since it was a very thin box that would surely be flattened if she asked a messengerial service to send it over to us.

1.) The first among the activities that we did was the ALIEN HEADBAND.


Rave: I like this simple DIY activity. It got him excited though a bit puzzled with the raw materials laid out with him initially. He love the fuzzy twisty stick that he tried following me when he saw me do one side.

Rant: none for the activity. It might be a bit kiddie like for older kids but heck, C loved his headgear!

2.) The next is the BUILD A ROCKETSHIP. This I was curious...and a bit excited. I have a good feeling about it.


Rave: C enjoyed coloring the rocketship template. I think he did a pretty good job! He got excited when he finally found out what the heck mom was deciphering with regards to the instructions in making the rocket fly. We got excited with doing it (blowing) when we all know what to do.

Rant: I don't know if it was me or what but I got so confused with the instructions on how to roll the rectangular paper. I'm sorry but I was overwhelmed? I didn't for the life-of-me know what to do aside from rolling it. The instructions could be better made or worded.  I gave up after a few minutes since C was getting restless already. Daddy had to step in and save-the-day.


3.) Next activity was MAKE DAY AND NIGHT HAPPEN.


Rave: This was an interesting concept with regards to teaching kids light and day - via the shadow and obstructions. C enjoyed making land masses on the "balloon earth". It made him practice his hand coordination. I also got to correct his grip on the scissors.

Rant: The balloon was easy to blow up...it is the tying it to secure the balloon was the tough on. I guess we can't be balloon twisters! Actually, a lot in this activity was done by the adults than C, which left C sometimes bored since it was bit more technical and higher level of comprehension from a 3 year old.

4.) For the POWER OF THE SUN...we had to defer this experiment since it would require the sun out and at its full heat. Its has been pretty gloomy these days so we still need to do the bonus activity Power Of The Sun. But I am sure it's an interesting one but not for C's level yet.


VERDICT?
a.) Packaging is not as sturdy for transport or delivery compared to ExploreSandbox. The box is thin and is a bit on a delicate side thus I had to just pick up my box from my friend's home so she would not have the trouble of having to repackage our KaHone. Tedious but I do like the appealing graphics of the box and their mascot - the Cow.

b.) The activities are easily bought or downloadable, in my opinion on the web. Materials can be store bought and assembled, which isn't very creative. It seems that for a SAHM (Stay-At-Home Mom) like me, I can simply do it and get the materials at the bookstore or department store.

c.) I did enjoy the activities that made him color, use his motor skills and understand blowing unto a straw. It was something that C's school would do and so the activity was smooth and he followed instructions well. But if this was for an older child, maybe some of the activities might not be suited for him like the Alien Headband.

d.) The price of a KaHone is cheaper by around Php250 compared to ExploreSandbox. Based on the activities and for the suitability for C, I would choose ExploreSandbox from the way we did the activities.

For more information about KaHone Art, please visit their Facebook page.

Tuesday, February 11, 2014

Product Review (Pt. 1 of 2): Boxed Acitivities - ExploreSandbox

This is Part 1 of 2 parts since I recently was given the opportunity to try two types of Activity in a Box from two different suppliers of these in Manila.

The first one is Explore Sandbox. As per the site: "Explore Sandbox is a monthly themed subscription box, targeted for kids ages 3 to 7, that is delivered straight to your doorstep. Themes vary on a month-to-month basis. We do all the research, preparation and sourcing for you, leaving you to focus on connecting with your child."

Activities in a box like these has grown in popularity in recent years as a way for working, busy parents to still provide educational and at the same time, memorable experiences with their children. The concept is be able to take the children away from just being in front of a television set or a gadget and get back to the basics of exploration and discovery through experiments and doing. It can be done alone or with adult supervision. The activities deal can be from sensory play, arts and crafts, to simple experiments and more. The box would contain 4 to 5 activities that revolve around a common theme assigned for the month, and would vary from toys, materials and guidelines, which is included in the box.
 
This month's (February 2014) activity set is Colors and Shapes. There were: (1) Wooden Tops, (2) Accessories Making, (3) Geoboard and (4) Colored Balls.


I suggest you review the box before giving it to your kids to start playing unless they are meticulous in reading instructions and is a bit more organized. In my case, I made sure I was at home to get the box and review what is needed for what activity.  It looked so impressive upon opening! Check out below.


(1) WOODEN TOPS: dealt with Primary and Secondary Colors, hand coordination in spinning the tops

Instructions: color wooden tops and use one color per section. When finished, spin and see how the color changes as the top gains speed.


I would have wanted C to take a bit more effort in coloring the tops so he could see the color changes from Primary to Secondary colors when he spun the tops but I think at this age, he was more interested in the game than the color changes.

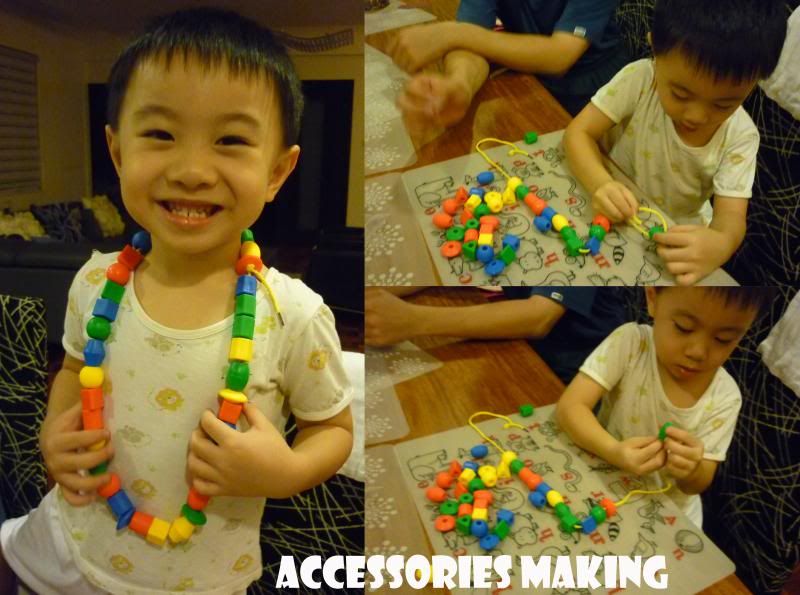
(2) ACCESSORIES MAKING: Fine motor skills and patience in getting the bead through the string

Instructions: String together a combination of shapes and colors and when completed, tie the ends together.


I know this is one of the popular exercises in C's school and so he knew what to do immediately. The only difference is that this exercise, it became a necklace to wear.

(3) GEOBOARD: recreation of shapes, promote fine motor and math skills

Instructions: Use the rubber bands to make different shapes on the Geoboard.
Note: the Geoboard is a math manipulative that can be used by older children to understand math concepts like perimeter, area, angle, measurement and polygons. It can also practice and promote fine motor skills to create letters and numbers.


After showing C what to do, he quickly took an interest to this activity. C has been interested in shapes and colors and this was was his "cup of tea". He enjoyed the tactile feel of the board and the interesting shapes he was making just by placing the right rubber bands to the right pegs. He experimented on a lot of types of shapes by stretching and pulling the rubber bands on the board. It also gave him a sense of imagination. He kept overlapping rubber bands to make shapes.
I liked the fact that this can be reused for future educational teaching tools as stated.

(4) COLORED BALLS: chemical changes and observations

Instruction: Mix 1 part vinegar and 1 part water and pour into container. Choose one colored ball and place in bowl then squirt solution to container. Observe the color change in the solution. See the surprise inside.


I was more excited of this than C, since he was more interested in squirting water unto the container than observe the chemical reaction. Some of the balls arrived crumbled already so I'm wondering if better transport container should be done since some came in half already so "the surprise" can be seen or the ball disintegrated even before we started. Also, the solution might need more strength since I remember using almost the whole bottle for one ball and it wouldn't dissolve the ball to reveal the surprise. You also have to notice the solution well since we only got partial disintegration.
Nonetheless, C enjoyed the chemical reaction and even smelled the solution after, where I had to explain to him what it was since he couldn't find the right words to describe the "sour" smell.

RAVES
(1) Being a busy mom with two kids, who is also busy with household chores and kids activities in school, this box really is a life-saver and gives parents like me the chance to do some home-schooling like classes, even if it's within an hour or so at our own leisure. It is allows parents to start activities with their children together without having to plan days in advance for research tools and materials.

(2) I like how the makers of Explore Sandbox thought of the packaging since it came in a very sturdy box for transportation/delivery easy.

(3) Since this box is on a monthly basis, this type of subscription based item provides both, parents and children, an excitement that is very similar to opening a Christmas present though on a monthly basis, while at the same time tackling on the world of discovery and experiments. I loved how they addressed it to my son. It made him realize that the box is for him when he first saw it.

RANTS:
(1) The crumbled color balls was a bit of a disappointment. It sort of lost it's "mystery factor" regarding what is inside since 2 out of the 3 balls had already cracked and I didn't see much color change in the solution till the 3rd (last ball) since it was intact and had better colors to show my son what the solution colors were. Plus the prize inside was basically the same but different colors. I think it might appeal to girls since since boys wouldn't really know what those are. Maybe a small plastic toy or something would have been better.

(2) The sets per activity wasn't packaged as a package. It was laid out all together, though it really looked good in the box, it took a bit of organizing and reading the instructions to make sure the proper item was for the said activity. Not a really huge deal but it would be a good idea if the materials per activity would be individually packaged.


Overall Review: I liked it! I also think C appreciated the change in bonding activity instead of just reading a book, writing practice or watching TV (gasp!) after dinner.
There was much thought for the activities that you couldn't get in a store. I.e. Colored Balls and Geoboard. I do appreciate the further thought that some of the items can be played again and again like the Accessories Making and Geoboard and can later be used for other purpose - whether for play or education.

If you want more information, pricing or would like to order ExploreSandbox you can, email your queries to ExploreSandbox at gmail dot com or via mobile at +63.917.6955.

Monday, February 03, 2014

Breastfeeding: Inverted Nipples - how do you know you have it and what do you do?

Now you know if you have a inverted or flat nipple…what do you do?


Well, first and foremost it to:-

1.)    Knowing what a proper latch looks like. I have searched online and always refer to the Breastfeeding Guro of Dr Jack Newman. He has a video posted on Youtube that can help describe what the good latch is all about.
Proper Latch:  http://www.youtube.com/watch?v=Wj9tLgYn-bA
Asymetric:  http://www.youtube.com/watch?v=VHs2Ql5Kylo
Latch with a Lactation Aid:  http://www.youtube.com/watch?v=ezGIkIkhC_o
More videos are here: http://www.youtube.com/results?search_query=jack+newman+breastfeeding

During your initial feedings, your baby may be able to open his mouth wide enough and suck vigorously enough to draw the nipple far into his mouth and close his gums on the areola, so the flat or inverted nipple may not present a major problem. Having someone to help you with latch on and positioning can be very helpful.

You will want to nurse as soon as possible after birth, and every 2-3 hours after that. You want to avoid engorgement, because breast swelling can cause the nipples to flatten out, making them more difficult to grasp. (See article on Engorgement for tips on how to avoid this problem).

For initial learning period of breastfeeding, try to avoid the use of any artificial nipples. Supplement with alternative feeding methods, because the baby who is learning how to nurse, especially on a nipple that isn’t the ideal shape for nursing, is more likely to become nipple confused. See article Introducing Bottles and Pacifiers to the Breastfed Baby to get more detailed information on alternate feeding methods.

If feedings become stressful, stop and comfort your baby. Try rocking, swaddling, walking, giving him your finger to suck, or offer him some expressed milk or water or until he settles down. You want him to associate feedings with positive feedback, not negative.

2.)    What is an inverted/flat nipple?

A) The nipple below is what a nipple is normally shaped. 
 
B) The nipple below is an example of what an inverted nipple looks like. 


C) A simple "pinch test" will show you whether your nipple is inverted: Using your thumb and index finger, gently squeeze the areola about 1 inch behind the nipple. This technique will make a normal nipple protrude.


 D) The pinch test will make an inverted nipple pull inward.


3.)    What if you DO HAVE an INVERTED NIPPLE? It’s not the end of the world. It is helpful if you have help from a Lactation Consultant, if possible during the first feedings, as these are likely to present the most problems.

Many mothers with flat or inverted nipples experience some degree of nipple soreness. You may experience soreness as the nipple is drawn into the baby’s mouth, and the adhesions are stretched or broken. If the nipple draws back into the baby’s mouth during or immediately after feedings, moisture may become trapped and contribute to soreness. Try patting the nipples dry after feedings and apply a thin coating of lanolin or olive oil.
Here are some of consolidating tested techniques in getting them out and easy for your baby to latch on:-

a.       Hoffman Technique.
Doing this technique several times a day may help loosen the adhesions at the base of the nipple. To employ this technique: place a thumb on each side of the base of the nipple - directly at the base of the nipple, not at the edge of the areola. Push in firmly against your breast tissue while at the same time pulling your thumbs away from each other. By doing this you will be stretching out the nipple and loosening the tightness at the base which will make the nipple move up and outward. This exercise should be repeated 5 times a day, moving the thumbs in a clockwise fashion around the nipple. It can be used during pregnancy and after baby begins breastfeeding.

b.      Nipple stimulation.
After birth (unless the nipples retracts completely), if the nipple can be grasped, a mother can roll her nipple between her thumb and index finger for a 30 seconds to a minute or two and then quickly touch the nipple with a moist, cold cloth or ice wrapped in cloth,
immediately before offering it to your baby. A disposable nursing pad that is dampened and put in the freezer makes a great ice pack can also to help the nipple evert immediately before nursing.

NOTE: Avoid prolonged use of ice as it can inhibit the letdown reflex and numb the nipple too much

c.       Pulling back on the breast tissue/areola before you latch the baby on.
As you support your breast for latch-on with thumb on top and four fingers underneath and way back against the chest wall, pull slightly back on the breast tissue toward the chest wall to help the nipple protrude.

d.      Nipple Shield.
WARNING:
Nipple shields should only be used when a lactation professional recommends them and supervises their use, they can be helpful in certain situations.
This is a thin, flexible silicone nipple with holes in the end that fits over your nipple during feedings. Nipple shields, in the past, were made out of thick rubber that caused a significant decrease in the mother’s milk supply. They were handed out freely to new mothers in order to ‘reduce nipple soreness’ or to get babies to nurse at the breast. Under these circumstances, they created more problems than they solved. Modern nipple shields are made from a clear, thin layer of silicone, which means that more stimulation reaches the areola, and the reduction of milk volume is minimized.


The below is from Dr Jack Newman’s account regarding Nipple Shields on his Facebook account.

One of the situations in which a nipple shield can be useful is in helping an infant latch on to a severely inverted or flat nipple, especially when other measures described above have failed. Mothers who use the shield should be instructed on how to wean the baby off the shield as soon as possible, and should weigh their baby frequently to assure adequate milk intake.

For many mothers, use of a shield is the first step in getting her baby to nurse at the breast, and may mean the difference between continuing to nurse or weaning. The mother’s ability to feel her baby sucking at her breast may encourage her to continue nursing after other attempts have failed. She needs to be encouraged to periodically put her baby on the breast without the shield until she is able to discontinue its use entirely. If the baby will take one breast without the shield, she should nurse him on that breast at each feeding, and use the shield only if the baby won’t take the other breast without it. While some babies move quickly from nursing with the shield to nursing without it (sometimes after only one or two feedings) other babies have to be weaned from it gradually. My niece, who had one normal nipple, and one that was severely inverted, used the shield on and off for several months. She monitored her baby’s weight gain carefully, and he is now happily nursing (without the shield) at the age of 18 months. Considering the severity of her inversion, I am not sure that her baby would have ever been able to nurse on that breast without the use of the shield.

***UPDATE!!! (Source International Breastfeeding Center)

MYTH: Women with flat or inverted nipples cannot breastfeed
.

ANSWER: Not true! Babies do not breastfeed on nipples, they breastfeed on the breast. Though it may be easier for a baby to latch on to a breast with a prominent nipple, it is not necessary for nipples to stick out. A proper start will usually prevent problems and mothers with any shaped nipples can breastfeed perfectly adequately. In the past, a nipple shield was frequently suggested to get the baby to take the breast.
THIS GADGET SHOULD NOT BE USED, ESPECIALLY IN THE FIRST TWO WEEKS!

Though it may seem a solution, its use can result in poor feeding and severe weight loss, and makes it even more difficult to get the baby to take the breast. (See Finger and Cup Feeding). If the baby does not take the breast at first, with proper help, he will often take the breast later. Breasts also change in the first few weeks, and as long as the mother maintains a good milk supply, the baby will usually latch on by 8 weeks of age no matter what, but get help and the baby may latch on before. See When a Baby Does not yet Latch.

e.       High Quality Pump.
If the soreness lasts for more than a week or two, you may need to use a high quality pump (See article Pumping and Storing Breastmilk) to help maintain your milk supply. When a nipple is severely inverted, the baby may compress the nipple buried inside the tissue, rather than the milk sinuses underneath the areola. The sucking action of the pump pulls out the center of the nipple uniformly, rather than compressing the areola. This can help gradually break the underlying adhesions.

If both nipples are severely inverted (which is not usually the case) you may need to double pump every 2-3 hours and feed your baby with an alternative method until the adhesions are broken and the nipples protrude. This is a situation in which renting a pump may really be worth it. In some extremely rare cases, the baby never successfully goes on the breast and you may need to continue pumping and feeding your expressed breastmilk by bottle. (See article Introducing Bottles and Pacifiers to the Breastfed Baby) for information on using bottles as well as alternative feeding methods.)

Usually, only one nipple is inverted and one breast is easier for the baby to grasp. In this case, you may want to feed on the ‘good side’ while you pump the other breast until the adhesions are loosened. You can feed the baby the milk you expressed on the inverted side after nursing on the other breast.

Some mothers can draw their inverted nipples out with just one pumping session. Others may need to continue pumping for days, weeks, or even months, depending on the degree of inversion and the baby’s sucking patterns. If the nipple inverts again during pauses in the baby’s feeding, you may need to stop and pump again for a few minutes and then put him back on the breast. In almost all cases, the adhesions will loosen and the baby will be able to nurse effectively as he grows bigger and stronger and becomes more efficient at nursing.

4.)     Other Resources:
a.       Breastfeeding Canada Inc
http://www.breastfeedinginc.ca/content.php?pagename=doc-WBD

b.      Dr Jack Newman on FB with a relevant posting:- https://www.facebook.com/DrJackNewman/posts/213653845452336

In almost all cases, the adhesions will loosen and the baby will be able to nurse effectively as he grows bigger and stronger and becomes more efficient at nursing, whether you invest in gadgets or not. Remember that the baby doesn’t ‘nipple feed’, instead the baby BREASTFEEDS. Once he is able to draw the nipple into his mouth, the shape of it doesn’t matter much at all.

Babies grow unbelievably fast, and his tiny mouth will ‘grow into a large/ flat/ or inverted nipple before you know it. Once the nipple inverts consistently, it seldom inverts again. Also, inverted nipples are much less common with second babies. Their older siblings seem to have paved the way, and pulled out the nipples for their baby brother or sister and making everyone in the family much happier!

**Need more info? Visit AlphaParent for All Breasts Can Breastfeed for more detailed discussion with regards breasts that were reduced, enhanced, etc. I find it all empowering!


Tuesday, January 21, 2014

Feature Alert: Sabine's First Birthday Party (featured at One Charming Day)

So honored for this...


A better view would be the below or you can use this link.

A Lilly Pulitzer Themed Birthday Party

Sabine’s 1st birthday bash is a party like no other!  It’s actually the first time I’ve seen or heard about a Lilly Pulitzer themed birthday party and if I’ll be honest, I had no idea who or what Lilly Pulitzer was until I saw this party (hihi!).  There are just so many fabulous details and I must say, Luxe Parties did a really awesome job in bringing the Lilly Pulitzer vibe and preppy taste to the party with all the vibrant pinks, greens and blues and chic colorful prints.  I specially loved the sweet treats corner where instead of the usual dessert table, you’ll find the treats beautifully displayed on mini tables, a cart and a chest with drawers.  Ornate frames, bird cages, colorful watering cans, bright pink and green flowers and the pink elephants and flamingos (very LP!) all added to the charm of the whole setup.
Sabine’s party is indeed too pretty for words! See it all here and prepare to swoon over these lovely photos captured by CasLow Photography.


Venue: Wack Wack Golf and Country Club
Styling: Luxe Parties
Photography: CasLow Photography
Food Stalls/Entertainment/Craft Tables: Party Packagers
Cake: The Bunny Baker
Cupcakes and Cookies: French Kiss Pastries
Catering: The Plaza, Inc.